• Jewellery
    • Public archives: 2023-2025
    • Public archive: 2020-2022
    • Public archives: Pre 2020
    • Private archives: B2B access
  • Media
  • Explorations
    • AI creations
    • Collab: OOMD
    • Tiny World Views
  • About
  • Menu

Abigail chui

jewellery that tell of tales
  • Jewellery
    • Public archives: 2023-2025
    • Public archive: 2020-2022
    • Public archives: Pre 2020
    • Private archives: B2B access
  • Media
  • Explorations
    • AI creations
    • Collab: OOMD
    • Tiny World Views
  • About
 

Natural Dyeing Recipe: Spinach

April 16, 2018 in Learn

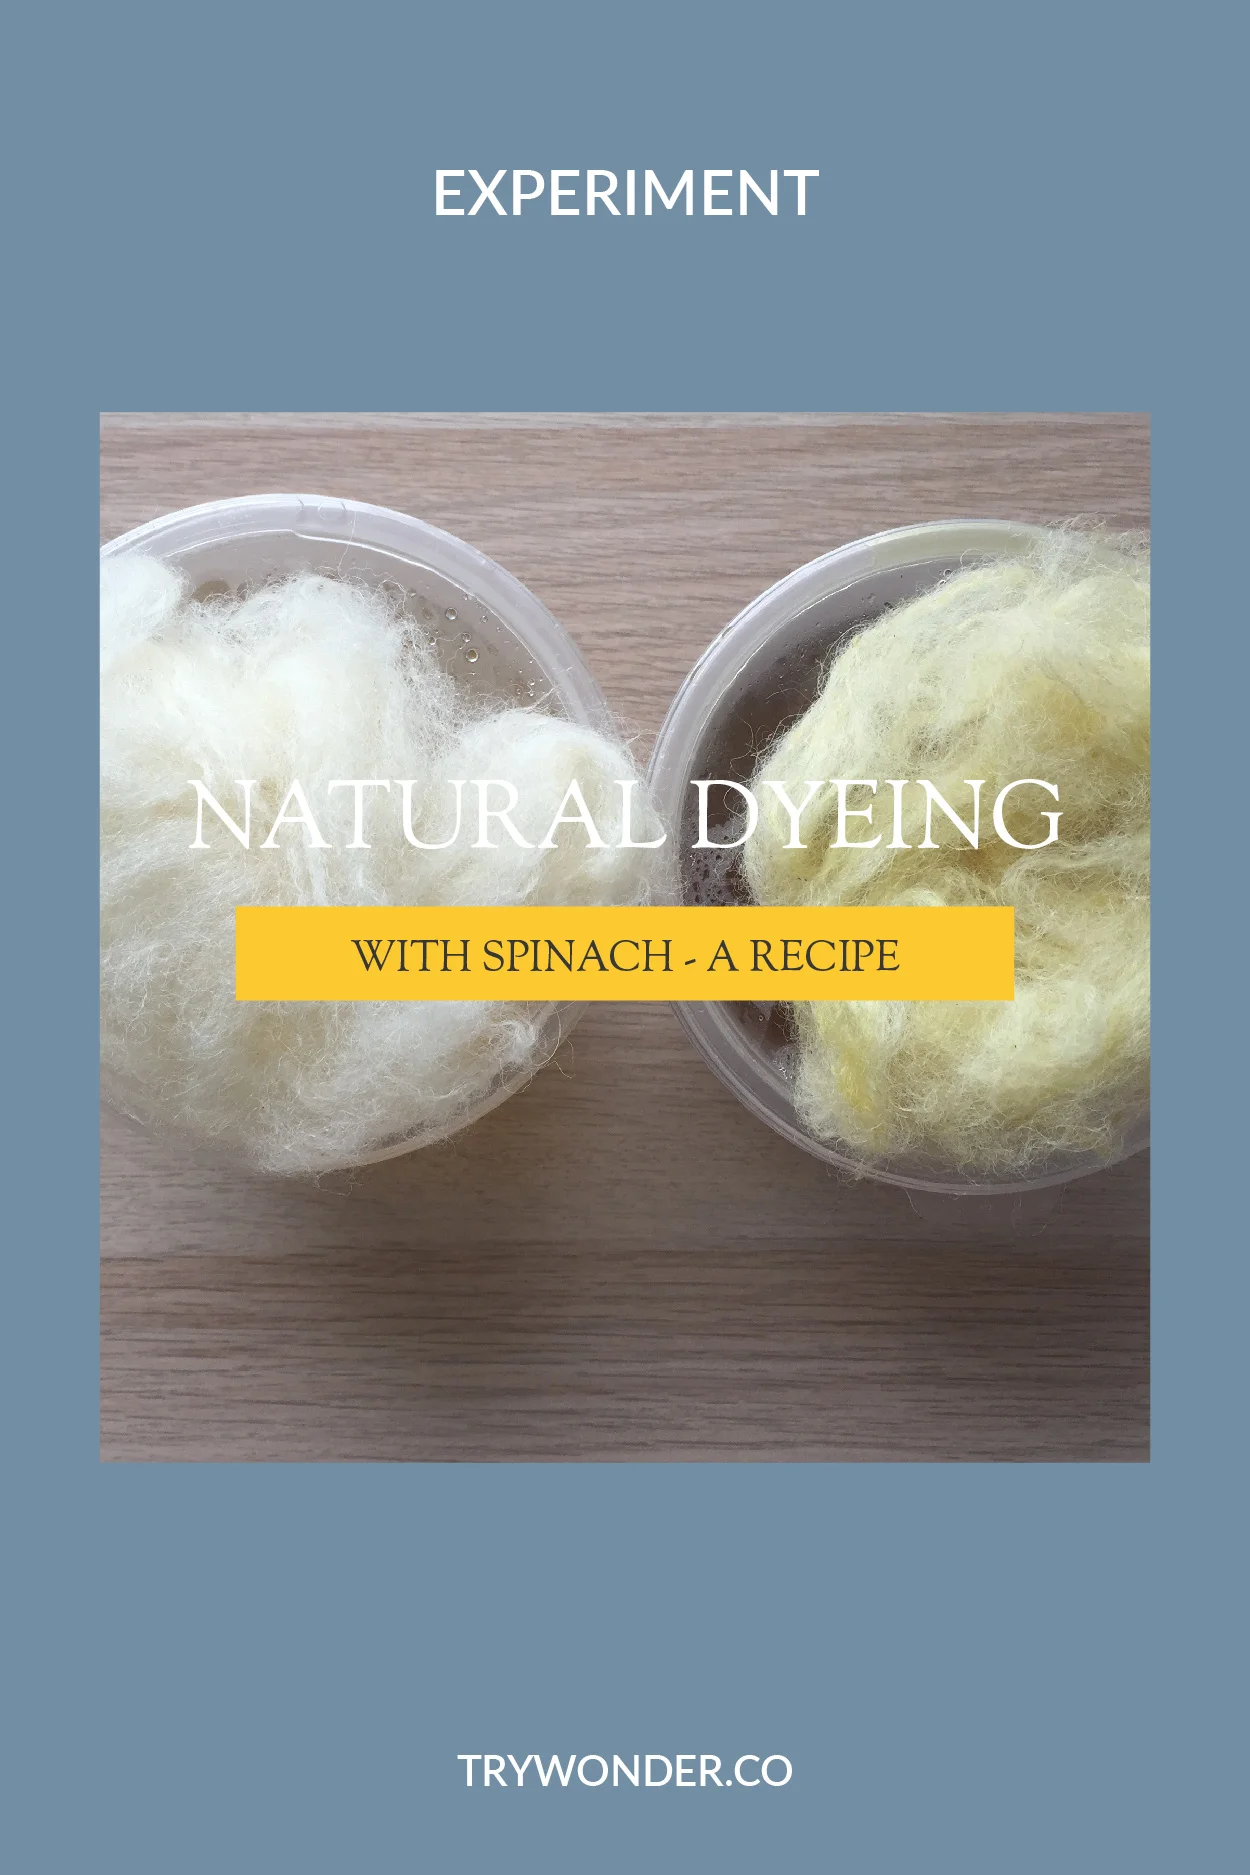
I used spinach because I was hoping to get greens. And I read that it’s possible if iron is added. But disposable of the dye bath would have been difficult and it’s toxic, so I decided to chance it and not use iron.

You need:
A bag of spinach
1/2 cup salt
2 tbs white vinegar
Water
Pot
Strainer / cheesecloth

  1. Add everything to the pot and bring to a boil
  2. Reduce to dimmer, simmer for about 1 hour
  3. Let cool before straining
  4. Adjust pH as desired

Looking back at my notes, I realised the original recipe I had written down didn’t require water. But I added it anyway, so maybe I could have gotten greens had I not added the water. Who knows! But if you try it, please share your results!!

Share what you’ve made on Instagram with #trywonder, I’d love to see what you’re up to!

 
try wonder blog natural dyeing spinach recipe cover

If you enjoyed this post, please share it on Pinterest, Facebook, and any other platform you use, thank you!

Comment

Natural Dyeing Recipe: Coffee Grounds

April 09, 2018 in Learn

I expected the pH of the original dye bath to be really acidic because coffee is acidic, but it was surprisingly fairly neutral, at a solid pH 6. The recipe did call for a lot of water though.

You need:
Coffee grounds
Water
Pot
Cheesecloth

  1. Mix 4 parts cold water to 1 part coffee grounds
  2. Bring to a boil, lower to simmer
  3. Simmer for about 30 minutes
  4. Let cool and strain
  5. Adjust pH as desired

I’m wondering if using less water and more coffee grounds would result in a richer colour. Or if making it really, really acidic would bring out more intense colours. So, it’s an idea for another project (:

Share what you’ve made on Instagram with #trywonder, I’d love to see what you’re up to!

 
try wonder blog natural dyeing coffee grounds recipe cover

If you enjoyed this post, please share it on Pinterest, Facebook, and any other platform you use, thank you!

Comment

Natural Dyeing Recipe: Tea

April 09, 2018 in Learn

For this, I used oolong tea leaves because it’s the only black tea I had, but it works. pH didn’t seem to make much a difference on it though.

You need:
Tea
Water
Strainer / cheesecloth

  1. Boil loose tea leaves in water for about an hour, until you’re happy with the intensity of dye bath
  2. Let cool before straining

Tea is rich in tannins, which is a natural mordant, so you don’t actually need a mordant when dying with tea. But for the sake of my sanity (dyeing 23 pieces of wool in a week!), I kept everything constant by having all the wool I used mordanted with alum.

There is another recipe which I found that suggested soaking tea leaves in water and white vinegar, 4:1, for about 20-60 minutes. And then to boil it after that. I think it’s more for plant-based fibres, and for use without mordanting as vinegar is one way to fix colours on cellulose textiles. So if I do this again, but with something like cotton or linen, I’d try this second recipe!

Share what you’ve made on Instagram with #trywonder, I’d love to see what you’re up to!

 
try wonder blog natural dyeing tea recipe cover

If you enjoyed this post, please share it on Pinterest, Facebook, and any other platform you use, thank you!

Comment

Microwave Dyeing

April 05, 2018 in Learn

I tried out microwave dyeing for a project for school, so I was on a tight time constraint. As a result, I tried microwave dyeing instead of the regular boil / steam your textiles in a pot of dye kind of thing.

I had briefly heard that it was possible, but could not find any information on the world wide web, so I just winged it. It kind of worked though! Here’s how I did it -

  1. Have wool soaked in dye bath in a microwave safe container
  2. Place in microwave with lid loosely on (it can be shut if there’s a ventilation hole on the lid). Heat on high for 3 minutes.
  3. Let rest (3-12 minutes)
  4. Repeat until you’ve heated it a total of 3 times of 3 minutes each.
  5. Let cool naturally, before rinsing and using your dyed textile! I left mine overnight to be really sure they were cooled all the way.


Remember not to shock wool by changing its surrounding temperatures drastically as it will case felting.

try wonder natural dyeing with microwave cover

If you enjoyed this post, please share it on Pinterest, Facebook, and any other platform you use, thank you!

Comment

Natural Dyeing Recipe: Turmeric

April 02, 2018 in Learn

I read a recipe that says 2 cups water to 2 tablespoons of turmeric powder, and I remember my proportions being similar, but ending up with a very powdery solution. And that’s after boiling it, because they said boiling will help the turmeric dissolve.

So I have no idea what went wrong with that, but my colour still came out really even and extremely vibrant, so I think it’s not too bad. I’d do it with less next time, but here’s what I did.

You need:
Turmeric powder
Water
Pot

  1. Mix water and turmeric powder, approximately 2 cups to 2 tablespoons, in a pot
  2. Bring to a boil
  3. Simmer for 30 minutes, stirring occasionally
  4. Let cool

That’s all, pretty simple right! Turmeric has to be rinsed when you take it out the dye bath because it’s so rich, and it will definitely stain other surfaces it comes in contact with. So be careful with this one!

Share what you’ve made on Instagram with #trywonder, I’d love to see what you’re up to!

 
try wonder blog natural dyeing turmeric recipe cover

If you enjoyed this post, please share it on Pinterest, Facebook, and any other platform you use, thank you!

Comment

Natural Dyeing Recipe: Avocado

April 02, 2018 in Learn

I got these for free from a cafe down the street. They had avocado salads on their menu so I asked, and they graciously said they’d keep it for me!

You need:
Avocado skins / pits
Water
Pot
Strainer / cheesecloth

  1. Wash skins / pits thoroughly
  2. Place in water and bring to low boil
  3. Reduce to simmer, and let simmer for 20-40 minutes, until you’re happy with the colour of the dye in the pot
  4. Leave to cool before straining
  5. Adjust pH as desired

I used only the avocado skins because that’s what I got, and used about 6 avocados worth to a large pot of water. Tbh, I expected prettier pinks, but these are lovely nonetheless!

The skins I used weren’t the cleanest ones around so I had random green-grey gunk floating in the pot. But it was fine when I strained everything! But it could have caused the pinks to be less dull, so, I’d clean them really well next time!

Share what you’ve made on Instagram with #trywonder, I’d love to see what you’re up to!

 
try wonder blog natural dyeing avocado recipe cover

If you enjoyed this post, please share it on Pinterest, Facebook, and any other platform you use, thank you!

Comment

Prepping the Wool - Mordanting

March 29, 2018 in Learn

According to what I’ve read, there are 2 proportions you could use. I might be doing things wrong because maybe there’s a way to have both recipes coincide, but mine didn’t.


Recipe 1

1 alum : 4 water

Recipe 2

5-20% weight of wool of alum in a bucket of water enough to cover all wool comfortably

I went with recipe 2 because the 1:4 ratio seemed like A LOT of alum, and I didn’t want to risk having the wool come out slimy (that apparently happens if you add too much alum). I took the smallest percentage of weight of alum, and then rounded it to the nearest 10. So I used 10g of alum, for about 98g of wool.

Here’s the math:

Weight of wool = 98g
7% of 98g = 6.86g
6.86g rounded to the nearest 10 = 10g

So it’s more than the minimum amount, but I figured as long as it’s under the 20% mark, I should be good. And it worked out okay!

Recipe aside, here’s what I did:

  1. Soak wool in cool water (no drastic temperature changes as it’ll shock the wool, which leads to felting), about 30 minutes at least
  2. Mix up mordant (in this case, alum + water). Make sure the water is not heated.
  3. Squeeze out water from wet wool (don’t wring, just squeeze), and place in cool mordant bath
  4. Heat very gently to just below boiling point
  5. Simmer for 1 hour
  6. Let cool slowly. I left mine overnight in the pot to cool
  7. Remove from mordant bath, squeezing out excess liquids. At this point, you can dry the wool for storage, or put it straight into dye baths. I let mine dry out for about 30 minutes because I needed to split them into tiny bundles. They were damp when I split them up. Just remember that wet wool goes into the dye bath more readily than dried wool.


If you found this useful, consider checking out the colours I got from this mordant, and the recipes I used! (Links below will be updated as they are posted)

Overview of colours + links to recipes
Adjusting pH
My dyeing process (Microwave dyeing!!)

 
try wonder blog mordanting wool process and recipe cover

If you enjoyed this post, please share it on Pinterest, Facebook, and any other platform you use, thank you!

Comment

Natural Dyeing Recipe: Sumak

March 26, 2018 in Learn

This is a mediterranean and middle eastern spice, so it might be as readily available in supermarkets, but Amazon has it!

You need:
Sumak
Water (I eyeballed it, at around 1 cup sumak to 3/4 pot water)
Pot
Cheesecloth / strainer

  1. Soak sumac in water for an hour
  2. Boil for 30 minutes
  3. Let cool and strain

According to my research, if you use an alum mordant with sumac on wool, you’ll get a dark yellow colour, but I did exactly that and got a bright pink! So, I guess this just proves that really, anything can happen with natural dyeing!

Also, you could potentially get a really nice grey if you add iron, but disposal of the iron would be tricky so have a plan before using it!

I didn’t try varying the pH of this dye because I didn’t have enough of it, but if you do, please, please share your results!

Share what you’ve made on Instagram with #trywonder, I’d love to see what you’re up to!

 
try wonder blog natural dyeing sumak recipe cover

If you enjoyed this post, please share it on Pinterest, Facebook, and any other platform you use, thank you!

Comment

Natural Dyeing Recipe: Hibiscus

March 26, 2018 in Learn

I got mine in dried flower form, so I ground them up slightly before using the recipe below. I figured it might take a shorter time to extract colour if everything was in smaller bits than bigger bits.

You need:
Dried hibiscus (I just got a handful of it)
Water (a full pot of water)
Pot
Cheesecloth / strainer

  1. Simmer hibiscus in filtered water for about 30 minutes (I just used tap water because Scotland’s water is pretty damn clean)
  2. Let cool then strain through strainer or cheesecloth
  3. Change pH as you desire

Share what you’ve made on Instagram with #trywonder, I’d love to see what you’re up to!

 
try wonder blog natural dyeing hibiscus recipe cover

If you enjoyed this post, please share it on Pinterest, Facebook, and any other platform you use, thank you!

Comment
Prev / Next

In a nutshell

Experiments, studio + factory tours, interviews and thoughts; all for your reading pleasure.

© 2016-2019 Try Wonder


I write about

Collaborations
Craft techniques
Studio / factory tours
Inspiration
Business + growth


10 image series

wild pebble estate?

identifying plants - how to identify

what to use them for

how i’ve used them

how to make things?

crafting experiments

list of things foraged

list of things to forage & why

a record of: things i’ve learnt @ martineau